Last weekend, my nephew showed me his Minecraft world, and I was blown away by his character’s appearance—a perfect replica of his favorite superhero, complete with a custom cape and intricate details I never knew were possible. That moment made me realize how much personality and creativity goes into customizing Minecraft skins, transforming the default Steve or Alex into something uniquely yours.
Whether you’re tired of looking like every other player on your favorite server or want to express your creativity through pixel art, learning how to customize your Minecraft skins with easy steps opens up a world of possibilities. From simple color swaps to complex character designs, skin customization has become one of the most popular aspects of the Minecraft community.
In this comprehensive guide, you’ll discover multiple methods to create and apply custom skins, explore the best tools and resources available, and learn pro tips that’ll make your character stand out in any multiplayer lobby. By the end, you’ll have everything needed to transform your blocky avatar into a digital masterpiece.
Understanding Minecraft Skins: The Basics
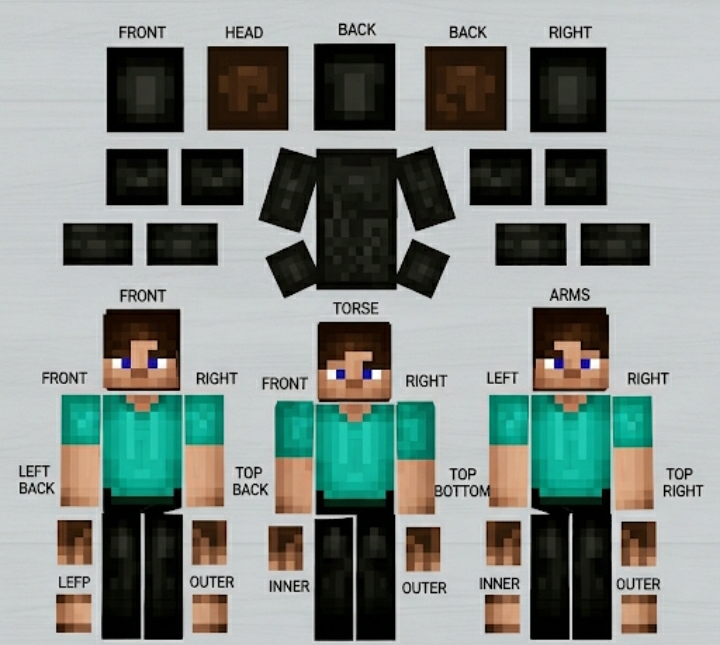
Before diving into customization techniques, it’s essential to understand what makes Minecraft skins tick. A Minecraft skin is essentially a 64×64 pixel texture file that wraps around your character model, similar to gift wrapping paper covering a box.

The standard skin format includes specific areas for the head, torso, arms, and legs, with additional space for accessories like hats, jackets, and sleeves. Modern Minecraft versions support both classic (64×32) and slim (Alex-style) arm models, giving players more flexibility in their character designs.
What makes skin customization so appealing is its accessibility—you don’t need expensive software or advanced artistic skills to create something impressive. Many players start with simple modifications like changing colors or adding patterns before progressing to more complex designs.
Method 1: Using Minecraft’s Built-in Skin Customizer
The easiest way to customize your Minecraft skins is through the game’s official character creator, available in Bedrock Edition. This built-in tool offers hundreds of pre-made components you can mix and match.
Getting Started with Character Creator
- Launch Minecraft and navigate to the “Profile” section
- Select “Edit Character” to open the customization interface
- Browse through categories like hair, clothing, and accessories
- Preview changes in real-time with the rotating character model
The character creator includes both free and premium content. Free players can access basic customization options, while those with Minecoins can purchase additional cosmetics from the marketplace. This method works perfectly for players who want quick results without external tools.
However, the built-in customizer has limitations. You’re restricted to pre-made components and can’t create entirely original designs. For truly unique skins, you’ll need to explore external methods.
Method 2: Creating Custom Skins with Online Editors
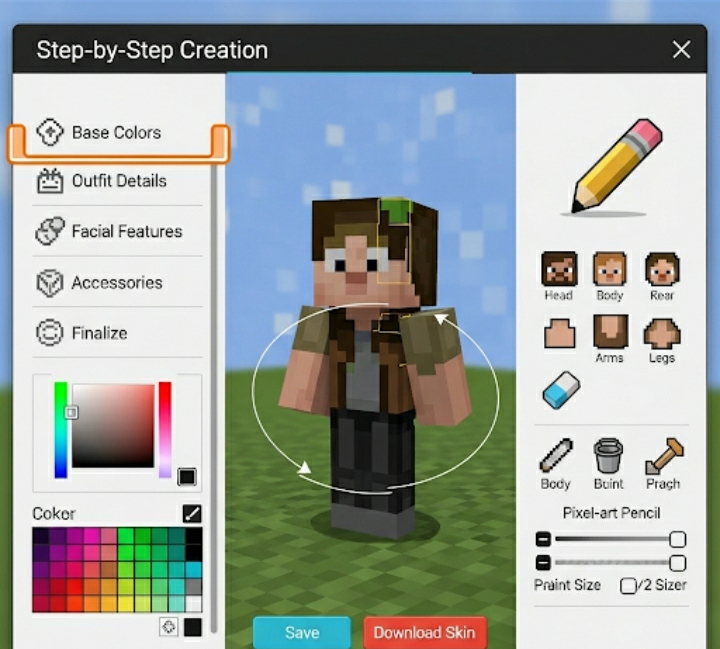
Online skin editors have revolutionized how players customize Minecraft skins with easy steps. These browser-based tools require no downloads and offer intuitive interfaces perfect for beginners.
Top Online Skin Editors
Skindex remains the most popular choice, featuring a user-friendly pixel editor and vast community gallery. Simply visit the website, choose “Create,” and start painting directly on the 3D model. The real-time preview system lets you see exactly how your design will look in-game.
MinecraftSkins.com offers similar functionality with additional features like skin templates and import options. Their editor includes helpful tools like symmetry mode, which automatically mirrors your edits across the character’s body—perfect for creating balanced designs.
For more advanced users, NovaSkin provides professional-grade tools including layers, animation preview, and high-resolution exports. While slightly more complex, it offers unmatched control over every pixel.
Step-by-Step Skin Creation Process
- Plan Your Design: Sketch ideas on paper or use reference images
- Choose a Base Template: Start with existing skin or blank canvas
- Work Section by Section: Begin with the head, then move to body parts
- Use Color Palettes: Stick to consistent color schemes for professional results
- Test Different Angles: Rotate the preview model frequently
- Save Multiple Versions: Create backups before major changes

Method 3: Advanced Skin Customization with Desktop Software
For maximum creative control, desktop applications like GIMP, Photoshop, or specialized tools like MCSkin3D offer professional-level customization capabilities.
Using GIMP for Skin Creation
GIMP’s free, open-source nature makes it accessible to everyone. Download a Minecraft skin template, open it in GIMP, and use layers to build complex designs. The software’s extensive brush collection and filter options enable effects impossible with online editors.
Key GIMP techniques for skin creation:
- Layer masking for transparent effects
- Pattern overlays for texture details
- Color balance adjustments for realistic shading
- Custom brushes for hair and fabric textures
Professional Tips for Desktop Editing
Advanced skin creators often use multiple software applications in their workflow. They might sketch concepts in Procreate, refine details in Photoshop, and test functionality in MCSkin3D. This approach produces museum-quality skins that command attention on any server.
Consider investing time in learning keyboard shortcuts and batch processing techniques. Professional skin creators can produce multiple variations in minutes rather than hours.
Installing and Applying Your Custom Minecraft Skin
Once you’ve created the perfect skin, applying it correctly ensures other players see your masterpiece exactly as intended.
For Java Edition Players
- Save Your Skin: Export as PNG file with correct dimensions
- Visit Minecraft.net: Log into your Mojang account
- Upload Your Skin: Navigate to profile settings and select “Browse”
- Choose Skin Model: Select classic or slim arms based on your design
- Confirm Changes: Click “Upload” and wait for processing
Changes typically appear within minutes but can take up to an hour on busy servers.
For Bedrock Edition Users
Bedrock Edition handles custom skins differently across platforms:
Mobile/Tablet: Use the character creator or import skins through file managers Console: Limited to marketplace purchases and character creator options Windows 10: Similar process to Java Edition through Xbox account settings
| Platform | Custom Skin Support | Method | Limitations |
|---|---|---|---|
| Java Edition | Full | Direct upload | None |
| Bedrock Mobile | Partial | File import | Limited servers |
| Console | Limited | Marketplace only | Paid content |
| Windows 10 | Full | Account settings | Xbox Live required |
Troubleshooting Common Skin Issues
Even experienced players encounter skin-related problems. Here are solutions to the most frequent issues:
Skin Not Showing: Clear your game cache and restart Minecraft. Sometimes server sync delays cause temporary display problems.
Wrong Dimensions: Ensure your skin file is exactly 64×64 pixels. Incorrect sizing prevents proper application.
Transparency Problems: Some online editors don’t handle transparent pixels correctly. Use desktop software for complex transparency effects.
Server Compatibility: Not all servers support custom skins. Check server rules before assuming technical problems.
Advanced Skin Customization Techniques
Professional skin creators employ several advanced techniques that separate amateur work from masterpieces.
Shading and Depth
Proper shading transforms flat designs into three-dimensional appearances. Study how light falls on real objects and apply similar principles to your skin. Darker pixels in recessed areas and lighter pixels on raised surfaces create convincing depth.
Animation Considerations
Remember that Minecraft skins animate with character movement. Design elements should flow naturally with walking, running, and arm-swinging motions. Avoid placing important details across joint lines where they might stretch unnaturally.
Color Theory Application
Understanding color relationships dramatically improves skin quality. Complementary colors create striking contrasts, while analogous colors provide harmony. Professional skins often use limited palettes to maintain visual coherence.
Building Your Skin Collection
Most dedicated players maintain libraries of custom skins for different occasions, servers, or moods. Organization becomes crucial as your collection grows.
Create folders categorized by themes: Medieval, Modern, Fantasy, Seasonal. Many players also keep Work-in-Progress folders for unfinished designs and Template folders for base designs they frequently modify.
Consider joining skin-focused Discord servers or Reddit communities. These groups share techniques, provide feedback, and often organize collaboration projects that push creative boundaries.
Conclusion
Customizing your Minecraft skins with easy steps has never been more accessible or rewarding. Whether you choose the built-in character creator for quick changes, online editors for moderate customization, or professional desktop software for masterpiece-level creations, the tools exist to bring any vision to life.
Remember that skin creation is a skill that improves with practice. Your first attempts might look rough, but each project teaches valuable lessons about color theory, digital art techniques, and the unique constraints of Minecraft’s pixelated medium.
The Minecraft community thrives on creativity and self-expression, and your custom skin becomes part of that ongoing conversation. Don’t be afraid to experiment, take risks, and most importantly, have fun with the process.
Ready to start your skin customization journey? Share your first creation in the comments below, or tell us about your favorite skin editor. Your experience might help another player discover their perfect creative tool!
Frequently Asked Questions
Can I use custom skins on all Minecraft versions? Java Edition offers full custom skin support, while Bedrock Edition has platform-specific limitations. Console versions typically restrict customization to marketplace content and built-in creators.
Are there copyright issues with creating skins based on popular characters? While creating character-inspired skins for personal use is generally acceptable, distributing copyrighted designs commercially can raise legal concerns. Original creations or clearly transformative works offer the safest approach.
How do I make my skin visible to other players on servers? Most servers automatically display properly uploaded skins. However, some servers disable custom skins for performance reasons or require specific procedures. Check server documentation for details.
What’s the difference between classic and slim skin models? Classic skins feature 4-pixel-wide arms, while slim models use 3-pixel arms. Choose based on your character design—slim works well for more feminine or slender characters, while classic suits broader designs.
Can I animate my Minecraft skin? Standard Minecraft skins don’t support custom animations beyond the game’s built-in movement. However, some mods and servers offer enhanced animation systems for advanced users.
How often can I change my Minecraft skin? Java Edition players can change skins as frequently as desired through their Mojang account. Bedrock Edition might have platform-specific limitations or cooldown periods.
Sources:
- Minecraft Official Wiki – Skins – Comprehensive technical information about skin formats and implementation
- Mojang Studios Support – How to Change Your Skin – Official guidance on skin uploading and troubleshooting
- The Skindex Community Guidelines – Best practices for skin creation and sharing