Last week, my gaming laptop was chugging along at 30 FPS during a crucial raid, and I nearly threw it out the window. You know that feeling, right? When your machine just refuses to cooperate during the worst possible moment. I’d spent good money on this laptop, and watching it struggle felt like betrayal.
Here’s the thing though: most gaming laptops aren’t performing anywhere near their actual capability. If you want to optimize your gaming laptop for better performance, you don’t always need expensive upgrades or technical wizardry. Sometimes it’s about working smarter, not harder.
In this guide, I’ll walk you through everything I’ve learned from years of tweaking, testing, and occasionally breaking (then fixing) my gaming setup. Whether you’re dealing with thermal throttling, laggy gameplay, or just want to squeeze every last frame out of your machine, we’ve got you covered.
Understanding Why Your Gaming Laptop Isn’t Performing
Before we dive into solutions, let’s talk about why gaming laptops underperform in the first place. Unlike desktops with their spacious interiors and beefy cooling systems, laptops are essentially high-performance computers squeezed into a briefcase. That creates some unique challenges.
Heat is enemy number one. When your CPU and GPU get too hot, they automatically slow down to prevent damage. This is called thermal throttling, and it’s probably happening more often than you realize. I’ve seen laptops drop from 3.5 GHz to 2.0 GHz just because the cooling system couldn’t keep up.
Then there’s the bloatware situation. Manufacturers love loading laptops with trial software, monitoring programs, and unnecessary startup applications. Each one nibbles away at your system resources like a swarm of digital mosquitoes.
Power settings are another sneaky culprit. Windows defaults to balanced power mode, which prioritizes battery life over performance. Great for spreadsheets, terrible for gaming.
Essential Windows Settings to Optimize Your Gaming Laptop for Better Performance
Power Management Tweaks That Actually Work
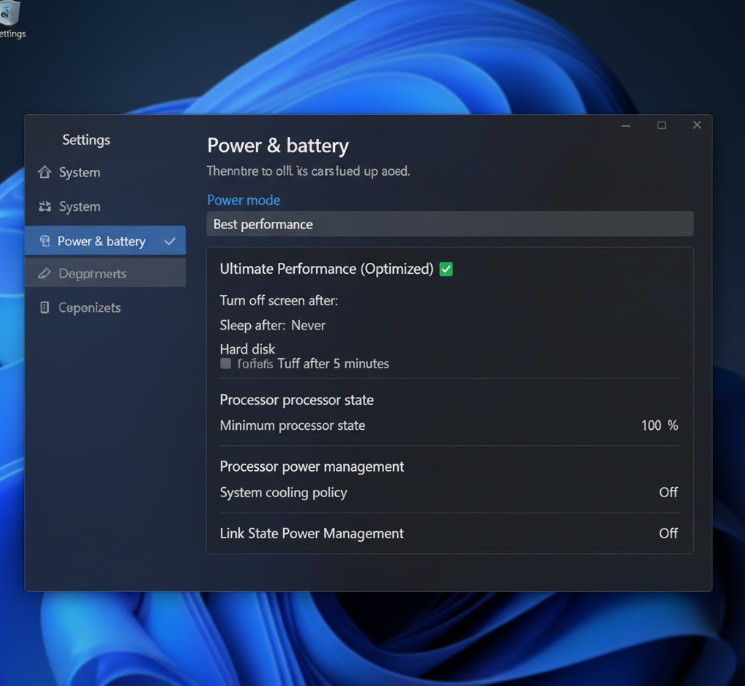
First things first: open your Windows power settings. You can get there by searching “power plan” in the start menu. Switch from Balanced to High Performance mode. This tells your laptop to stop being conservative and start being aggressive with resource allocation.
But don’t stop there. Click on “Change plan settings” and then “Change advanced power settings.” Under Processor power management, set both minimum and maximum processor state to 100 percent when plugged in. This prevents your CPU from downclocking during gaming sessions.
Here’s a pro tip most guides skip: adjust your PCI Express link state power management. Set it to Off. This prevents your graphics card from entering power-saving modes that can cause stuttering.
Graphics Settings You Need to Change
Windows 10 and 11 have a Graphics Settings menu that’s criminally underused. Search for “Graphics settings” in your start menu. Here you can manually assign which GPU handles specific applications.
Add your games as individual entries and set them to “High performance.” This ensures your dedicated GPU handles the heavy lifting instead of your integrated graphics. I can’t tell you how many times I’ve helped friends who were accidentally running games on their Intel integrated graphics while their RTX card sat idle.
Also, disable Game DVR in the Xbox Game Bar settings. Microsoft’s background recording feature sounds cool in theory but tanks performance in practice. You’re trading 5 to 15 FPS for a feature you probably don’t use.
Visual Effects and Background Processes
Windows loves fancy animations. Your gaming laptop does not. Right-click on This PC, select Properties, then Advanced system settings. Under Performance, click Settings and choose “Adjust for best performance.” This disables all the visual fluff.
You can selectively re-enable a few effects if the interface looks too dated, but honestly? You won’t notice once you’re in-game, and your laptop will thank you.
Now open Task Manager (Ctrl + Shift + Esc) and check the Startup tab. Anything you don’t absolutely need at boot should be disabled. Spotify, Discord, that RGB control software? They can wait until you actually launch them.
Hardware Maintenance and Cooling Solutions
The Dust Problem Nobody Talks About
I’m going to be real with you: when’s the last time you cleaned your laptop’s fans? If the answer is “never” or “I don’t remember,” we’ve found a major problem. Dust accumulation is silent but deadly for gaming laptop performance.
Grab a can of compressed air (not your breath, that adds moisture) and carefully blow out the vents. Hold the fans in place with a toothpick through the grille so they don’t spin freely, which can damage the bearings. You’ll be shocked at how much junk comes out.
For a deeper clean, you might need to open the bottom panel. Check YouTube for your specific laptop model’s disassembly guide. Once inside, you can clean the heatsinks directly and even replace thermal paste if you’re feeling adventurous.
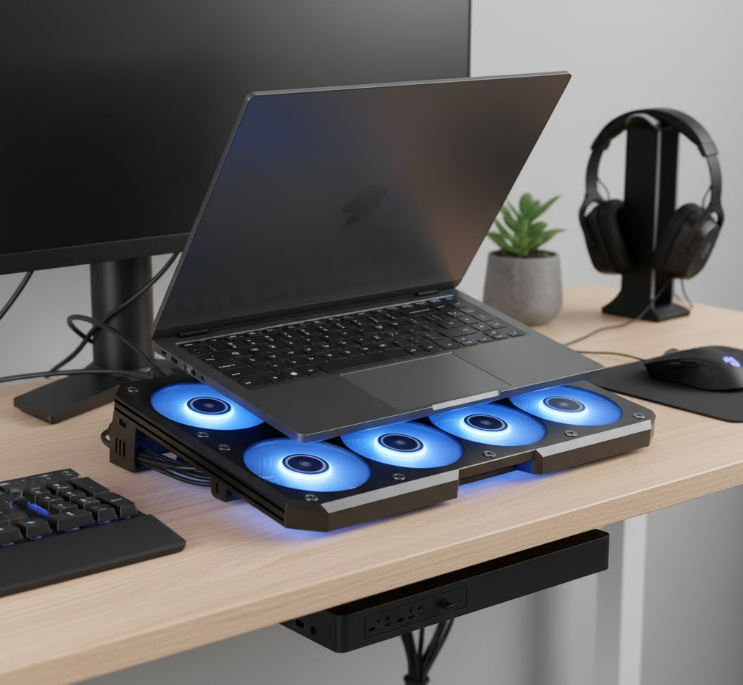
Cooling Pad Reality Check
Cooling pads get mixed reviews, but here’s my take after testing several: they work, but not equally. The best cooling pads have large fans (120mm or bigger) positioned directly under your laptop’s intake vents.
I use a cooling pad that dropped my CPU temperatures by about 8 to 10 degrees Celsius under load. That might not sound like much, but it’s the difference between throttling and not throttling. Position matters too. Elevating the back of your laptop improves airflow even without a powered cooling pad.
Avoid gaming on soft surfaces like beds or couches. Your laptop needs to breathe, and fabric suffocates those intake vents faster than anything else.
Thermal Paste Replacement
If your laptop is more than two years old, the thermal paste between your CPU/GPU and their heatsinks has probably degraded. Fresh thermal paste can drop temperatures by 10 to 20 degrees, which directly translates to better sustained performance.
This isn’t beginner-friendly territory, but it’s not rocket science either. You’ll need quality thermal paste (Arctic MX-5 or Thermal Grizzly Kryonaut are solid choices), isopropyl alcohol for cleaning, and patience. Watch model-specific guides multiple times before attempting.
I repasted my laptop last year, and the improvement was dramatic. Games that used to throttle after 30 minutes now maintain full speed for hours.
Software Optimization Strategies
Driver Updates Done Right
Keeping your GPU drivers updated is non-negotiable if you want to optimize your gaming laptop for better performance. Both NVIDIA and AMD regularly release game-ready drivers that improve performance and fix bugs.
For NVIDIA cards, use GeForce Experience. For AMD, use AMD Adrenalin. Don’t rely on Windows Update for GPU drivers because they’re often outdated by months. Set a reminder to check monthly.
Here’s the controversial part: sometimes older drivers perform better for specific games. If a new driver causes problems, don’t hesitate to roll back. Gaming communities often report which driver versions work best for popular titles.
Game-Specific Settings That Matter
Every game offers dozens of graphics settings, but not all impact performance equally. Here’s what actually moves the FPS needle:
Resolution and render scale have the biggest impact by far. Dropping from 1080p to 900p might hurt your pride, but it can double your frame rate. Render scale (often called resolution scaling) lets you maintain your display resolution while rendering at a lower internal resolution. It’s a sneaky compromise that works surprisingly well.
Shadow quality is a notorious performance hog. Ultra shadows look marginally better than High but cost 20 percent more performance. Drop shadows to Medium in most games without significant visual loss.
Anti-aliasing is another heavy hitter. TAA (Temporal Anti-Aliasing) offers the best performance-to-quality ratio. Avoid MSAA or SSAA if you’re struggling with FPS.
Post-processing effects like motion blur, depth of field, and film grain? Turn them off. They don’t improve competitive gameplay and tax your GPU unnecessarily.
| Graphics Setting | Performance Impact | Visual Impact | Recommendation |
|---|---|---|---|
| Resolution | Very High | Very High | Lower if needed |
| Shadow Quality | High | Medium | Set to Medium |
| Texture Quality | Low to Medium | High | Keep High (uses VRAM) |
| Anti-Aliasing | Medium to High | Medium | Use TAA |
| Post-Processing | Medium | Low | Disable most |
| View Distance | Medium | Medium to High | Reduce slightly |
Background Application Management
When you game, your laptop should focus on gaming. Period. Close Chrome with its 47 tabs. Quit Discord if you’re not using voice chat. Stop Spotify from streaming.
Use tools like Razer Cortex (free, works on any laptop) to automatically close background apps when you launch games. It also optimizes system resources and cleans temporary files. I was skeptical until I saw consistent 10 to 15 percent FPS improvements in CPU-bound games.
MSI Afterburner with RivaTuner Statistics Server lets you monitor GPU usage, CPU usage, temperatures, and FPS in real-time with an on-screen display. Knowledge is power. When you see what’s actually bottlenecking your system during gameplay, you can make informed adjustments.
Advanced Optimization Techniques
Overclocking Your GPU
Before you panic, laptop GPU overclocking is safer than it sounds because modern cards have built-in protections. They’ll throttle or shut down before damage occurs. That said, proceed carefully.
MSI Afterburner works with any GPU brand. Start by increasing your core clock by 50 MHz increments. Test stability with a game or benchmark. If stable, increase another 50 MHz. Repeat until you see artifacts or crashes, then back off by 100 MHz.
Memory clock can usually go higher. Try 100 MHz increments using the same testing method. I’ve gotten an extra 5 to 8 FPS in most games through conservative overclocking without any stability issues.
Undervolting is actually more interesting for laptops. By reducing voltage while maintaining clock speeds, you lower temperatures and reduce throttling. Tools like ThrottleStop (for Intel CPUs) or AMD’s Ryzen Controller make this accessible. Even a modest 75mV undervolt can drop temperatures by 10 degrees.
Storage Optimization
If your games are installed on a traditional hard drive, moving them to an SSD is the single biggest upgrade you can make. The difference between 5400 RPM HDD load times and NVMe SSD speeds is night and day.
Already on an SSD? Make sure it’s not full. SSDs slow down significantly when they’re over 75 percent capacity. Keep at least 20 percent free space for optimal performance.
Defragmenting SSDs is a myth, by the way. Don’t do it. Modern Windows handles SSD optimization automatically through TRIM. For HDDs, monthly defragmentation helps, but honestly, just upgrade to an SSD if possible.
Network Optimization for Online Gaming
A powerful laptop means nothing when your network connection stutters. Use a wired Ethernet connection whenever possible. WiFi might be convenient, but it introduces latency and packet loss that cable connections avoid.
Can’t use Ethernet? Position your laptop closer to your router, or invest in a WiFi 6 router if your laptop supports it. Also, change your router’s channel to avoid interference from neighbors’ networks. Tools like WiFi Analyzer help identify the least congested channels.
In Windows, disable background downloads during gaming. Windows Update loves picking the worst moments to download patches. Schedule updates for specific times and disable “Delivery Optimization” which shares updates with other PCs using your bandwidth.
Regular Maintenance Schedule
Here’s the maintenance schedule I follow to keep my gaming laptop optimized:
Weekly tasks: Clean exterior vents with compressed air, check for driver updates, clear temporary files using Disk Cleanup or CCleaner.
Monthly tasks: Deep clean fans and heatsinks, review and disable unnecessary startup programs, check storage space and uninstall unused games or applications.
Quarterly tasks: Benchmark your system to track performance trends, update BIOS if manufacturer releases stability improvements, back up important data and consider fresh Windows installation if performance has degraded significantly.
Yearly tasks: Replace thermal paste, inspect battery health, evaluate whether hardware upgrades (RAM, storage) make financial sense versus buying new.
This might sound excessive, but each task takes minimal time. Staying proactive prevents the scenario where your laptop suddenly can’t run games that worked fine six months ago.
When to Consider Hardware Upgrades
Sometimes optimization hits its ceiling. If you’ve done everything on this list and performance still disappoints, hardware might be the limitation. Here’s how to evaluate upgrade options:
RAM upgrades offer the best bang for buck if you have 8GB or less. Modern games love 16GB. Check if your laptop has accessible RAM slots. Many gaming laptops max out at 16GB or 32GB, and the upgrade is straightforward.
Storage upgrades from HDD to SSD, or SATA SSD to NVMe, dramatically improve load times and reduce stuttering in open-world games. This is usually the easiest laptop upgrade mechanically.
External GPUs are expensive and complicated but can give old laptops new life if they have Thunderbolt 3 or 4 ports. However, the cost often approaches buying a new laptop, so calculate carefully.
Sometimes the smartest optimization is recognizing when your hardware has reached end of life for your gaming needs. There’s no shame in admitting a five-year-old laptop with a GTX 1050 isn’t going to run 2024 titles at high settings, no matter how much you optimize.
Common Mistakes to Avoid
Through helping friends optimize their gaming laptops, I’ve seen these mistakes repeatedly:
Over-optimizing to the point of instability. Yes, you can squeeze out another 2 FPS by disabling Windows services, but when your system becomes unstable, you’ve gone too far. Maintain balance.
Ignoring temperatures. All the optimization in the world means nothing if your laptop runs at 95 degrees Celsius. Monitor your temps and address cooling before tweaking software.
Installing sketchy “optimization” software. Those “speed up your PC” programs are usually garbage at best, malware at worst. Stick with reputable tools from known developers.
Forgetting to create restore points. Before making significant changes, especially BIOS updates or registry tweaks, create a system restore point. It’s five minutes that could save you hours of troubleshooting.
Expecting desktop performance from laptop hardware. A laptop RTX 3060 performs significantly worse than a desktop RTX 3060 due to power and thermal limitations. Manage your expectations accordingly.
Conclusion
Learning how to optimize your gaming laptop for better performance isn’t about one magic trick. It’s a combination of smart settings, regular maintenance, and understanding your hardware’s capabilities and limitations. The tweaks I’ve shared here have collectively improved my gaming experience more than any single upgrade could.
Start with the easy wins: power settings, driver updates, and cleaning your fans. Those alone will make a noticeable difference. Then gradually work through the more advanced optimizations as you get comfortable.
Your gaming laptop is an investment. Treat it right with regular care and smart optimization, and it’ll deliver great performance for years. Ignore it, and even the most powerful specs will disappoint.
What optimization tips have worked best for you? Drop a comment below and share your experience. And if this guide helped boost your FPS, share it with your gaming crew. Everyone deserves smooth gameplay.
Frequently Asked Questions
How often should I optimize my gaming laptop for better performance?
Basic optimization like closing background apps and updating drivers should happen before each gaming session. Deep cleaning fans and checking system health should occur monthly. Thermal paste replacement and major optimization reviews work best on a yearly schedule. Regular maintenance prevents performance degradation rather than constantly fighting to restore lost performance.
Will optimizing my gaming laptop void the warranty?
Most software optimizations like changing power settings, updating drivers, or adjusting in-game graphics won’t void warranties. However, opening your laptop to clean fans or replace thermal paste might void warranty depending on your manufacturer. Check your warranty terms before opening the case. Many manufacturers now include “user-serviceable” panels that don’t affect warranty status.
Can optimization damage my gaming laptop?
Conservative optimization is safe. Changing Windows settings, updating drivers, and cleaning exterior vents carries virtually no risk. Overclocking introduces minor risk if done recklessly, but modern hardware has protections against damage. The riskiest activities are physical work like thermal paste replacement where user error could cause problems. Follow guides carefully and start with low-risk optimizations first.
What’s the single most effective way to boost gaming laptop performance?
If forced to choose one, ensuring proper cooling delivers the biggest impact. A laptop that thermal throttles loses 20 to 40 percent performance automatically. Cleaning fans, using a cooling pad, and repasting thermal compound address the root cause of most gaming laptop performance issues. Everything else optimizes around margins, but cooling affects whether your hardware runs at full speed or not.
Is it worth paying for optimization software?
Generally no. Free tools like MSI Afterburner, ThrottleStop, and Razer Cortex handle most optimization needs excellently. Paid “PC optimizer” software often delivers minimal real benefits and sometimes includes bloatware. The exception might be manufacturer-specific tools from brands like ASUS, MSI, or Alienware that offer genuine hardware-level controls. Stick with reputable free tools and manual optimization for best results.